
Download and Use
Published as Open Source under Apache-2.0 License
https://www.npmjs.com/package/xcoobee-cookie-kit-web
What is the Difference
The XCK is an active cookie and consent management framework for your site. This is different from a cookie-notification only based text box.
Most current cookie GDPR notices for websites are just that: Overlays that display information but do not actively manage cookie creation and life-cycles. You are still responsible for handling cookies and fingerprinting correctly. In contrast to this, the XcooBee Cookie Kit is a true cookie-consent and life-cycle manager. It will help you implement the premises of the GDPR and European e-directive correctly.
Super Quick Start Example
- Load the library from the CDN using script tag:
<script id="xcoobee-cookie-kit" src="https://app.xcoobee.net/scripts/kit/xcoobee-cookie-kit.min.js"></script>
- Set your managed cookies with
<xbee-cookie>tag in your HTML DOM like so:
<xbee-cookie category="application" name="usersess">abhchkshsdh</xbee-cookie>
<xbee-cookie category="usage" name="theme">dark-blue</xbee-cookie>
- Initialize the Cookie kit to manage things at the end of your page rendering:
<script>
  function blankCh(){};

  XcooBee.kit.initialize({
    checkByDefaultTypes: ["application","usage"],
    cookieHandler: "blankCh",
    position: "right_bottom",
    privacyUrl: "#privacyUrl",
    requestDataTypes: ["application", "usage", "statistics"],
    termsUrl: "#termsUrl",
    textMessage: "Welcome to our site. We manage cookies responsibly and listen to our users. You can check and uncheck which types are OK."
  });
</script>
See Parameter Reference for all the things you can do.
Done !!
This was a super simple example, the XCK will take on GDPR and e-directive related tasks from here. Of course,there are many more and in-depths examples later.
Video
What is the XCK
The objective of the XcooBee Cookie Kit (XCK) is to enable websites to manage their Cookie consent more effectively and with less annoyance to their users. The XCK can work in concert with the XcooBee network to improve overall management for users and businesses but that is not required. When the XCK works independently of XcooBee some management functionality will not be available.
The XCK makes it easy to add cookie consent management into your website. It handles all user interaction to obtain consent and lets the website know which cookies can be used for each user while they visit your website. Similarly, your website can now be informed when users change their consent even when they are not visiting it.
The XCK is one of the most transparent and frictionless ways to manage cookies on your site. It will not pop-up, in, or otherwise hinder the user experience when it is not needed. Yet, at the same time, it provides compliance with European e-directives and related GDPR rules.
Website owners can easily react to data-requests and report on privacy related requests if needed via the XcooBee network.
The XCK does not require a XcooBee connection to work for your website. You will still have access to the majority of user consent gathering but will not have central insight and consent management.
The XCK is responsive and will adjust easily to different screens including mobile uses.
Quickstart to get to <script> tag examples.
Features
With cookie kit you can:
- use XcooBee pre-classification of cookies to present simplified and clear details of how you will use cookies
- share your cookie policies
- share your terms of service
- share your privacy policy
- determine cookie setter/unsetter interactions
- integrate with backend-services for cookie notifications
- transparently determine whether notification is necessary
- allow users to remove/add consent for cookies
- set timing and position of information display
- properly react to user consent grants and removal requests
With subscription to XcooBee you can also:
- document your cookie consent interactions
- remote manage user consent
- document proper response time to user requests
- set additional style and logo elements
- allows users to use crowd cookie intelligence
Easy Cookie Classification
The XCK uses a classification system for cookies rather than listing each individual cookie with its origin. By putting cookies into logical groups the XCK removes the need for technical expertise to distinguish individual cookies. Users can make an easier decision based on the intended use of the cookie rather than the domain name or any other technical criteria.
The XcooBee classification system broadly places cookies into one of the following types:
- Required or Application Cookies
- Personalization Cookies
- Statistics Cookies
- Advertising and Marketing Cookies
For more information please visit XcooBee Cookie Classification.
Example Applications
We have included three example applications that make use of the XCK so you can see it in action yourself.
Single Page Application
Our cafe application demonstrates the use of XCK in a single page application. You can unzip and deploy on a webserver like IIS or Apache. The files are located in examples/cafe-spa.zip. Review the index.html file for instructions/explanations.
Sample Request/Response app based on NodeJs & Express
Our pizza application demonstrates the use of the XCK in a request/response based application. You can unzip and deploy it directly on your system. You will need nodejs installed on your system for some. Review the README.md file for instructions/explanations in each of the example application Single Page (SPA), Express, and ReactJS:
Cookie Kit Example Application
Sample ReactJS based application
A clone of our cafe app to demonstrate the use of the XCK with React. We are using the special React Build of the XCK for this and you should review the react-cookie-kit on npm js.
Cookie Kit Example React Application
How does this Work
The Cookie

The XCK displays a floating cookie icon on the screen in a corner of your choice. This is the starting point for user interaction. By clicking on the cookie icon, users open a popup consent dialog that allows them to interact with your site.
If the XCK determines that a user consent is needed it will go to the next step and open the XCK Pop-up dialog:
The Pop up Dialog
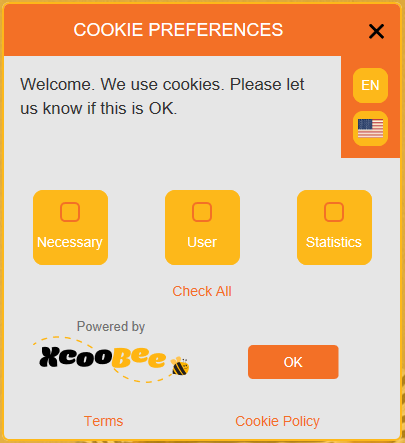
The XCK can automatically determine when a full consent dialog or just the cookie is needed. Thus, making the site visit more pleasant and frictionless.
When using the XCK you:
- a) first determine which cookies you are currently using on your site
- b) then select which XcooBee cookie type (classification) that best fits each cookie
- c) display to your site visitors the XCK consent dialog popup to ask for permission
- d) after obtaining consent for a type of cookie, set the cookies in that group for your user using either a handler inside client JavaScript or target url pattern via server syntax (PHP, JSP, .net etc.) or both.
If the cookie consent is already obtained, the XCK will not display another popup. You can query the status via JavaScript to set the cookies again, or track this on the backend side if you’re using Request/Response type application.
Example walk through
Let’s assume an example of a JSP driven shopping site that uses four cookies. Here is sample process to implement proper cookie consent management using the XCK:
a You determine that you use the following four cookies on your site.
- Your JSP session cookie
- A user cookie to keep track of user’s theme
- A site statistics cookie from your webserver
- A global statistics cookie from Google Analytics
b You classify the cookies into the following types
Application: JSP Session Cookie
Personalization: user cookie
Statistics: local webserver cookie & google analytics cookie
c You initialize and render the XCK script to display the user consent popup.
d User makes selection and clicks OK.
e The XCK invokes your site’s JavaScript handler process that sets or removes the cookies.
Cookie Pulses
The cookie kit uses a short cut evaluation method to check whether it has already obtained consent for cookies from the user. This streamlines the setting of cookies. When this is successful, the cookie icon that is placed into a designated corner, is replaced by pulses. There are different color pulses to indicate a shortcut selection has occurred.
Green: user explicit approval

The green pulse indicates that the user has visited this site before and the site’s cookie consent settings are known and can be reapplied.
Blue: preferences based approval

The blue pulse indicates that though the user has not visited this site before, the user has set consent preferences for new sites which can be applied. This is only possible when user and website are XcooBee network members.
Yellow: crowd intelligence based approval

The yellow pulse indicates that the user has elected to participate in the XcooBee Crowd AI program for cookies. The XcooBee network will use a crowd based analysis and set the cookies based on feedback from website visitors. This is only possible when user and website are XcooBee network members.
Red: using website preferences

The red pulse indicates that we do not have any information directly from the user. In such a case, the website owner can select to use the website preference for cookies instead of user preferences. This can only be done if website and user are located outside the EU.
Install
You activate the XCK by embedding it into your site via <script> tags. In addition, during invocation you provide additional parameters to the script tag.
Some of these include:
- position of the icon button
- terms url
- cookie policy url
- expiration time for the widget
- text message
- cookie handling function
- site defaults
- target Url
When you subscribe to XcooBee you can also specify:
- your campaign reference
- company logo
- cssAutoLoad
A campaignId is needed for the XCK to communicate with XcooBee and allow management of consents. Please visit XcooBee if you need to create an account. Without it the XCK will work in offline mode.
Modes of Operation
The XCK operates in two modes. One, in disconnected mode, where the XCK and your website interact directly without the use of XcooBee network. Two, in connected mode, where XCK interacts with the XcooBee network to allow companies to document and manage cookie consent while giving users additional tools to manage and simplify cookie handling.
In the following we explain how each mode works.
Disconnected Mode
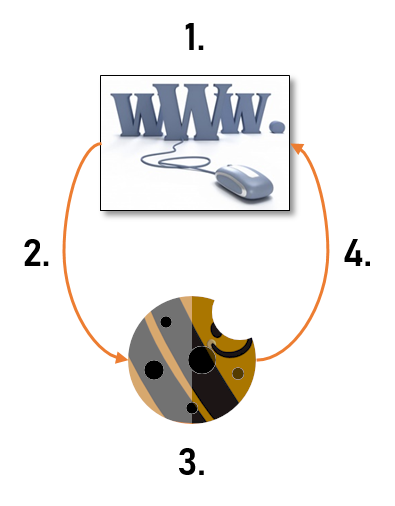
In disconnected mode,
- your web site loads and renders its content without setting cookies
- loads the XCK with your parameters
- the XCK handles user interaction for cookie consent
- communicates back to your site which cookie types can be set.
Your site, then, sets the cookies according to user preferences.
Connected Mode

Connected mode is similar in process with differences in each step to reflect additional tools:
In connected mode,
- your web site loads and renders its content without setting cookies
- loads the XCK with your parameters including your campaign references
- the XCK handles user interaction for cookie consent. For XcooBee users the XCK transparently negotiates with your site based on user preferences. XcooBee users can surf sites with little interruption.
- XCK communicates back to your site which cookie types can be set.Your site, then sets the cookies according to user preferences.
- As site owner, you can review all managed cookie consent. Report on compliance issues, take action when users change their consent even when not visiting your site. Your site visitors (users) can actively manage cookie consent centrally, and transparently surf your site without annoying popups.
How to Use the XcooBee Cookie Kit
This section explains how to use the XCK on your site.
How to use Cookie Kit in Single Page Application (SPA)
When using a SPA you can specify a JavaScript handler that can receive the result of the user interaction for cookie consent. Thereafter you need to load the scripts and/or set the cookies directly based on the user’s interaction.
Since this can change, you also need to be able to remove the cookies when users change their mind.
In both cases, the XCK will invoke your handler function after the user has completed their interaction with XCK.
XCK will call your JavaScript handler with a JavaScript object. The user preferences are enumerated in the argument.
You can find an example of an SPA on github.
Here is and example object.
{
  "application": true,
  "usage": true,
  "statistics": false,
  "advertising": false
}
Thus the call signature will be: handlerFunction(cookieObject).
For example if your handler function is named cookieHandler and the function argument object is named userCookiePreferences this would be the signature of your function:
cookieHandler(userCookiePreferences);
Sample cookieHandler function:
function cookieHandler(consentSettings) {
  if (consentSettings.application) {
    // set required cookies here
    // ...
  } else {
    // remove required cookie here
    // ...
  };

  if (consentSettings.usage) {
    // set user personalization cookies here
    // ...
  } else {
    // remove user personalization cookies here
    // ...
  };

  if (consentSettings.statistics) {
    // set site statistics gathering cookies here
    // ...
  } else {
    // remove site statistics gathering cookies here
    // ...
  };

  if (consentSettings.advertising) {
    // set advertising and marketing and tracking cookies here
    // ...
  } else {
    // remove advertising and marketing and tracking cookies here
    // ...
  };
}
See a more fully developed example later in this document.
How to use Cookie Kit with Request/Response systems like PHP, Node, JSP, .net, CFML etc.
The XCK can communicate users’ grant and removal of consent for cookies to your site via webhook post (HTTP POST) as well. You will need a web accessible endpoint as defined by targetUrl that can process these messages and set/unset the cookies by cookie type.
However, depending on your situation you still might be able to handle all interactions inside JavaScript without reloads or calls to backend (see example below)
The HTTP POST will be using CONTENT-TYPE = application/json
The body content is a JSON object with the user selection of cookie types. Only the cookie types for which you have asked for consent will be included.
{
  "time": "2018-10-31T16:40:28",
  "code": 200,
  "result": {
    "application": true,
    "usage": false,
    "statistics": true
  }
}
Where:
time => date of the decision in UTC
code => 200 for success
result => the JSON with information about cookie types
A sample process to handle cookie consent via a Request/Response and a handler-page pattern could look like this. Your handler-page is most likely a piece of code that will need to be included in all page rendering calls. You will also need to be able to call it independently.
- Your system starts without any cookies
- If no cookies are defined you invoke the XCK
- The XCK gathers user consent and call the
handler-pageindentified intargetUrlparameter handler-pagesaves user decision and flag that user has made decision- for each subsequent call, the
handler-pagechecks that user decision is available and sets the cookie types
Your handler-page will probably employ this kind of logic
- determine whether this is a regular call (included) or call from XCK to save user decision
- if regular call
- determine if we have user cookie type decision
- if we do not have decision -> load XCK by inserting
<script>tags into HTML to present cookie choice to user - if we have user-cookie-decision -> load cookies for each allowed type
- if called from XCK
- save user-cookie-decision
You can also review our example application Express/NodeJs on Github.
Example use with PHP page combined with Cookie Kit
In this example we assume that we have a website running PHP engine to render webpages. As part of this process the website will load the XCK to manage user consent. You are managing cookie creation via JavaScript.
The management process breaks into this flow:
a. PHP page writes the values for each of cookie types into HTML/Javascript stream
b. Include JS Handler Code (example below)
c. Load XCK
a Pipe PHP variables with script tags into HTML
In this example, we assume that you have JS <script> tags for all the cookies that you need to create and saved them to corresponding PHP variables in this manner:
$cookie_scripts_application => the required application cookies, e.g.

for example:
<script>
  document.cookie = $cookieName;
</script>


$cookie_scripts_user => the user personalization cookies

for example:
<script>
  var favoriteColor=blue;
</script>


$cookie_scripts_statistics => the site statistics cookies

for example:
<!-- Google Analytics -->
<script>
(function(i,s,o,g,r,a,m){i['GoogleAnalyticsObject']=r;i[r]=i[r]||function(){
(i[r].q=i[r].q||[]).push(arguments)},i[r].l=1*new Date();a=s.createElement(o),
m=s.getElementsByTagName(o)[0];a.async=1;a.src=g;m.parentNode.insertBefore(a,m)
})(window,document,'script','https://www.google-analytics.com/analytics.js','ga');

ga('create', 'UA-XXXXX-Y', 'auto');
ga('send', 'pageview');
</script>
<!-- End Google Analytics -->

$cookie_scripts_advertising => the site advertising cookies

for example:
<script
  src="https://code.jquery.com/jquery-2.2.4.min.js"
  integrity="sha256-BbhdlvQf/xTY9gja0Dq3HiwQF8LaCRTXxZKRutelT44="
  crossorigin="anonymous">
You would output each of these be HTML encoding them, like so
<script>
// define cookie script management scope in JS
var myCookieScripts = {};

// most likely we can set this directly since these would be required
myCookieScripts.application = "<?php echo htmlentities(preg_replace( "/\r|\n/", "", $cookie_scripts_application )); ?>";

myCookieScripts.user = "<?php echo htmlentities(preg_replace( "/\r|\n/", "", $cookie_scripts_user )); ?>";

myCookieScripts.statistics = "<?php echo htmlentities(preg_replace( "/\r|\n/", "", $cookie_scripts_statistics )); ?>";

myCookieScripts.advertising = "<?php echo htmlentities(preg_replace( "/\r|\n/", "", $cookie_scripts_advertising )); ?>";
</script>
b write a JS Handler
You need to define your handler in JS. We are including a few helper functions that will actually set your cookies and load your scripts.
  /**
   * parse html encoded script directives
   * @param {string} htmlData - string with script tags to be loaded
   * @return {object} the fully parsed html elements
   */
  function xckParseHtml(htmlData) {
    //parse encoded via text area
    var txt = document.createElement("textarea");
    txt.innerHTML = htmlData;

    // now add this as html to our mirror doc
    var el=document.createElement("html");
    el.innerHTML = txt.innerText;
    return el;
  }

  /**
   * Load Javascript. Can load from remote file or code.
   * @param {object} loadScripts - The HTMLCollection of scripts to be loaded
   */
  function xckLoadJs(loadScripts) {
    var i = 0;
    if (loadScripts.length > 0){
      for (i = 0; i < loadScripts.length; i++) {
        var item = loadScripts[i];
        var script = document.createElement("script");

        if (item.src === "") {
          script.text = item.text;
        } else {
          // load from file
          script.async = true; // we always load async
          script.src = item.src;
          script.onload = function () {
            console.log(`cookie script from ${item.src} is ready!`);
          };

          // other elements
          if (item.integrity !== "") {
            script.integrity = item.integrity;
          }
          if (item.crossOrigin !== "") {
            script.crossOrigin = item.crossOrigin;
          }
        }

        // now append to document for execution
        document.body.appendChild(script);
      }
    }
  }

  /**
   * This will be invoked by XCK when user clicks OK button
   * @param {object} consentSettings - The collection containing user decisions
   */
  function myCookieHandler(consentSettings) {
    // parse cookie scripts passed from PHP

    if (consentSettings.application) {
      // parse cookie scripts passed from PHP
      let myEl = xckParseHtml(myCookieScripts.application);
      let appScripts = myEl.getElementsByTagName("script");
      // set required cookies here
      xckLoadJs(appScripts);
    } else {
      // remove required cookie here
      // ...
    };

    if (consentSettings.usage) {
      // parse cookie scripts passed from PHP
      let myEl = xckParseHtml(myCookieScripts.user);
      let userScripts = myEl.getElementsByTagName("script");
      // set required cookies here
      xckLoadJs(userScripts);
    } else {
      // remove user personalization cookies here
      // ...
    };

    if (consentSettings.statistics) {
      // parse cookie scripts passed from PHP
      let myEl = xckParseHtml(myCookieScripts.statistics);
      let statScripts = myEl.getElementsByTagName("script");
      // set required cookies here
      xckLoadJs(statScripts);
    } else {
      // remove site statistics gathering cookies here
      // ...
    };

    if (consentSettings.advertising) {
      // parse cookie scripts passed from PHP
      let myEl = xckParseHtml(myCookieScripts.advertising);
      let adsScripts = myEl.getElementsByTagName("script");
      // set required cookies here
      xckLoadJs(adsScripts);
    } else {
      // remove advertising and marketing and tracking cookies here
      // ...
    };
  }
c Load XcooBee Cookie Kit
As outlined in a few areas, when you wish to start the XCK dialog, include the <script> tags in your HTML stream.
<script id="xcoobee-cookie-kit" src="https://app.xcoobee.net/scripts/kit/xcoobee-cookie-kit.min.js"></script>
<script>
  XcooBee.kit.initialize({
    checkByDefaultTypes: ["application"],
    cookieHandler: "myCookieHandler",
    position: "right_bottom",
    privacyUrl: "http://mysite.com/privacy",
    requestDataTypes: ["application", "usage", "statistics"],
    termsUrl: "http://mysite.com/terms",
    textMessage: "Welcome to our shopping site. We use cookies to deliver a better service to you. Please let us know if this is OK."
  });
</script>
How to use the XCK with XcooBee subscription and high security data exchange
When you have a XcooBee subscription your website can also receive updates regarding the granted consent when the user is not directly online via the XcooBee network. This communication will occur through webhooks and higher level of encryption.
As an alternative to direct HTTP POST, your subscription to the XcooBee network also allows event polling so you can use the XCK for sites that are not directly accessible via the internet, i.e. intranet sites or sites under development.
You need to be able to process messages from XcooBee that are using PGP encryption on top of HTTPS/TLS.
The message pattern is the same as described previous section.
You can use one of the XcooBee SDKs for simplifying this interaction:
The use of the XcooBee network is not a required interaction. Users will transparently update their cookie preferences with your site every time they visit.
Managed Cookies and Scripts
Most cookie notices do not implement life cycle management, and if you, as the programmer, do not implement the correct behavior for user interaction events you will still fail your GDPR audit and your company may become liable for compliance failures. The XCK offers you a very simple alternative that keeps you easily compliant.
Using managed cookies and scripts is the easiest way to declare and manage cookies with the XCK. This approach allows the XCK to manage the life-cycle of your cookies from creation to destruction. It requires only minimal application changes. As long as your application can write an HTML tag you can create managed cookies and scripts.
The features are implemented through two additional HTML tag extensions you can use:
<xbee-cookie> </xbee-cookie><xbee-script> </xbee-script>
You need both an opening and a closing tag.
You should declare all your tags before calling the XCK initialize() function.
xbee-cookie tag
The <xbee-cookie> tag allows you to declare a singular managed cookie.
It is a declaration for cookies that you can add anywhere in the HTML DOM where you wish to set cookies.
The XCK will manage life cycle including removal automatically.
If possible tags should be written in one line:
<xbee-cookie category="application" name="supercookie">supercookievalue</xbee-cookie>
The value of the cookie is between opening and closing tags (innerHTML).
Attributes:
  name      => the name of the cookie you wish to set
  category  => one of the cookie categories: application, usage, statistics, advertising
  days      => optional: the number of days to set the cookie, if not provided will expire with session
Examples:
<xbee-cookie category="usage" name="mycookie">this is a value of the cookie</xbee-cookie>
<xbee-cookie category="advertising" name="mybuypcookie">great cookie</xbee-cookie>
xbee-script tag
If you are setting cookies via remote scripts or have to load 3rd party scripts that set some cookies the easiest way to manage them is to use the <xbee-script> tag.
The xbee-script tag works like the HTML script tag but has two additional attributes. This allows you to easily convert existing <script> tags into <xbee-script> tags.
The tag content is Javascript that will be run later after we obtained consent from users. You can also specify remote scripts via src attribute as usual. You will need to add a closing tag as a single line autoclose </> is not allowed:
<xbee-script src="https://wrongtypeofusage/need_a_close_tag"/>
instead use this
<xbee-script src="https://betterexample.com/with_close_tag"> </xbee-script>
Additional Attributes:
  action => one of "set" or "unset", you can provide clean up scripts with "unset" attribute
  category => one of the cookie categories: application, usage, statistics, advertising
Example:
  <!-- Google Analytics example with cookie kit -->
  <xbee-script category="statistics" action="set">

      (function(i,s,o,g,r,a,m){i['GoogleAnalyticsObject']=r;i[r]=i[r]||function(){
      (i[r].q=i[r].q||[]).push(arguments)},i[r].l=1*new Date();a=s.createElement(o),
      m=s.getElementsByTagName(o)[0];a.async=1;a.src=g;m.parentNode.insertBefore(a,m)
      })(window,document,'script','https://www.google-analytics.com/analytics.js','ga');

      ga('create', 'UA-XXXXX-Y', 'auto');
      ga('send', 'pageview');

  </xbee-script>
  <!-- End Google Analytics -->
Since scripts that are loaded from different domains can create cookies that are not directly accessible by XDK due to same origin policy in browsers, the XDK allows you to create cleanup scripts that can be run for each domain.
In this case the action attribute of unset can be used to designate scripts that clean up cookies when users remove consent.
Example:
  <!-- Example removal script call -->
  <xbee-script category="statistics" action="unset" src="https://facebook/remove.js">
  </xbee-script>
Remember:
YOU WILL NEED AN OPEN <xbee-script> AND CLOSE </xbee-script> TAG EVEN WHEN YOU ONLY USE SRC ATTRIBUTE.
Full Parameter Reference
The XCK is initialized with a set of parameters that determine the behavior of the XCK on your site. This can include rendering location, timeouts, event handlers, css etc.
The following is a list of parameters the XCK can process:
checkByDefaultTypes array
This is an array of strings of cookie types used on your sites by default. This is one or more of [application|usage|statistics|advertising]. The default is empty array.
Example:
checkByDefaultTypes: ["application"]
cookieHandler string or function
If you are using a single page application or a JavaScript based solution for setting cookies you need to specify a cookie handler function, e.g. handleCookies(<object>). The XCK will call this function with the user’s preferences or defaults as needed. This function should either remove or set the cookies based on the categories allowed by user.
This is related to targetUrl. One of cookieHandler or targetUrl is required to be specified for XCK to start.
See more information in section How to Use the XcooBee Cookie Kit in this document.
cookieHandler: handleCookies
displayOnlyForEU boolean
This lets the XCK know to do quick evaluation of the call context for the XCK if the users are outside the EU. If the XCK determines that it is being loaded outside the EU (28 nation block) and there are no user defaults or other guidance, the XCK can automatically apply company standard cookies using the checkByDefaultTypes setting. When doing so it will inform the user by pulsing red. The visiting user can still change the decisions at any time. Default is: false.
expirationTime integer
This is the time in seconds we will display the floating cookie icon. After the expiration time has been reached the floating cookie icon will be removed from display. This time resets every time the icon is clicked and a popup dialog is displayed.
When set to zero, the icon will not be removed.
Defaults to zero.
expirationTime: 0
hideBrandTag boolean
This will remove the powered by XcooBee brand tag. Though we would appreciate if our work is correctly represented we understand that there is a need for controlling this. If you are a commercial entity we encourage you to subscribe to XcooBee so we can continue supporting open source projects like this in the future. Default: false
hideOnComplete: true
hideOnComplete boolean
The XCK can be completely hidden once the user has made the cookie type selection or the selection can be automatically determined. To enable the immediate removal of the cookie icon set this to true. Default: false
hideOnComplete: true
position string
The position parameter is one of [leftbottom|lefttop|rightbottom|righttop] and indicates the position from which the XCK displays its window or floating cookie icon. Default: left_bottom
position: "left_bottom"
privacyUrl string required
This is the page the user will be directed to to review your Privacy Policy. The cookie kit will not start without data for Privacy Policy.
privacyUrl: "https://mysite.com/privacy"
requestDataTypes array
This is an array of strings of cookie types used on your sites for which you wish to obtain the users’ consent before creating. This is one or more of [application|usage|statistics|advertising]. The default is application.
requestDataTypes: ["application"]
targetUrl string
If you are using Request/Response technology based site, for example PHP, JSP, CFML and you set the cookies in your code, the XCK will make a call via HTTP POST to the targetUrl you specify and a body parameter with JSON payload with the user’s preferences for cookies.
Example Body Payload:
{
  "time": "2018-10-11T15:40:28",
  "code": 200,
  "result": {
    "application": true,
    "usage": false,
    "statistics": false
  }
}
You will, then, need to set cookies by cookie type accordingly. We encourage the use of HTTPS/TLS connections to ensure proper security.
This is related to cookieHandler. One of cookieHandler or targetUrl is required to be specified for XCK to start.
See more information in section How to Use the XcooBee Cookie Kit in this document.
targetUrl: "https://mysite.com/setCookies"
termsUrl string required
This is the page the user will be directed to to review your Terms of Service. The cookie kit will not start without valid terms of service.
termsUrl: "https://mysite.com/terms"
testMode boolean
The XCK can run in test mode. When it does it will display a small reset button under the main floating cookie. You can use it to clear the local data store. This speeds up development tasks as you do not need to clear data manually or open/close private browser windows. Default: false
testMode: true
textMessage string required
This is the message we will display to the user when asking for cookie preferences. This message can be formatted as string or as JSON. When using JSON you can specify the message in different languages. The XCK will make an attempt to determine the default language based on browser settings and fallback to US English if it cannot make a determination. The cookie kit will not start without a consent message to display to users.
Example of text entry in single language:
textMessage: "This site uses cookies. Please select the cookie types that you wish to use and then click OK"
Example of text entry in multiple languages:
{
  "en-us": "English text",
  "de-de": "German text",
  "es-419": "Spanish text",
  "fr-fr": "French text",
}
Initialization Parameters with XcooBee Subscription
campaignReference
This connects your campaignId to the XCK. The XcooBee campaign wizard will generate it for you.
companyLogo
The XCK can display your company logo. Your cookie campaign options will have the ability to upload a logo and will make available to the XCK.
This parameter is only available when subscripting to XcooBee.
CSS override
If you wish to use your own CSS, the XcooBee code generator will set this based on your selection for your Cookie Campaign. Your campaign wizard will guide you through the process.
IMPORTANT
Your campaign name in the XcooBee campaign console needs to match your domain name (first part of the URL, e.g. https://mysite.com) for which you are using the cookie kit. If this is not the case, you will have errors returned from the XcooBee network.
For example if your site runs on this url “http://www.mysite.com/product/hello” the domain is http://www.mysite.com. This has to be your campaign name in XcooBee.
Program Hooks
You can use public methods of the XCK to set and retrieve parameter information. These are found under the XcooBee.kit object.
setManagedCookie([category:string], [cookieName:string], [cookieValue:string], [days:integer])
Create fully GDPR compliant cookies using the setManagedCookie() method. You are offloading all interaction and life-cylce management of the cookie to the XCK. The XCK will ensure that proper consent is obtained for the cookie from the user before setting it and also remove the cookies when user removes consent.
This is the JavaScript equivalent to using the <xbee-cookie> tag in your HTML. You will be automatically compliant with all GDPR interactions when using managed cookies.
options:
  category    => required: one of: application, usage, statistics, advertising
  cookieName  => required: name of your cookie
  cookieValue => require: the value of your cookie
  days        => optional: days to perist, default is 0 = session
example:
XcooBee.kit.setManagedCookie("usage", "myUserColor", "green");
setParam([parameter:string], [value:object])
Use the setParam() method to set any valid parameter for the XCK. For example to set the targetUrl parameter to a different value. Where parameter [string] is any of the valid parameters, and value [any] is data for the parameter.
XcooBee.kit.setParam("targetUrl", "https://newsite.com/cookieProcessor");
If you are using a cookieHandler JavaScript function that is not exposed in global scope, you will need to let the XCK know via a setParam call. You should do this after loading the XCK but before calling XcooBee.kit.initialize().
XcooBee.kit.setParam("cookieHandler", myCookieHandlerFunction);
Alternately, you can initialize with correct function reference.
<script>
  XcooBee.kit.initialize({
    requestDataTypes: ["application", "usage"],
    checkByDefaultTypes: ["application"],
    cookieHandler: myCookieHandlerFunction,
   ...
  });
</script>
This can be useful when you wish to turn off certain function during runtime, e.g. the hideOnComplete param can be used to hide the XCK after user has confirmed cookie selection.
getParam([parameter:string]) object
Retrieves the value of actively used parameter from the XCK.
Example:
let termsSite = XcooBee.kit.getParam("termsUrl");
getConsentStatus() string
Returns the current status of the XCK interaction with the user. Current this is one of [open|complete|closed].
open => user is being asked for consent at the moment
complete => we have received consent information from user
closed => the user did not respond and the cookie consent has expired after expirationTime
let consentStatus = XcooBee.kit.getConsentStatus();
getCookieTypes() object
This returns the users’ decision regarding the consent for each cookie type. It will always return a full object with all types or empty object {}.
Only available after getConsentStatus() = "complete" If you call this before we have an answer from user we will return an empty object.
Example call:
let cookieTypes = XcooBee.kit.getCookieTypes();
Example return object:
{
  "application": true,
  "usage": true,
  "statistics": false,
  "advertising": false
}
Examples of script tag
You will embed/install the XCK via added a script tag to your site. Here is an example of what this could look like.
You need to place this in the HTML of your site in between <head> and <body> tags. We suggest this as last script element.
<script id="xcoobee-cookie-kit" src="https://app.xcoobee.net/scripts/kit/xcoobee-cookie-kit.min.js"></script>
<script>
  XcooBee.kit.initialize({
    requestDataTypes: ["application", "usage"],
    checkByDefaultTypes: ["application"],
    cookieHandler: myCookieHandler,
    expirationTime: 0,
    position: "left_bottom",
    privacyUrl: "https://mysite.com/privacy",
    termsUrl: "https://mysite.com/terms",
    textMessage: "This site uses cookies to make your experience better. Please let us know which type of cookies we may use."
  });

</script>
Here is an example of parameters and values types for the initialization:
<script id="xcoobee-cookie-kit" src="{URL}/scripts/kit/xcoobee-cookie-kit.min.js"></script>
<script>
  XcooBee.kit.initialize({
    campaignReference: <String>,
    checkByDefaultTypes: <Array>[application|usage|statistics|advertising]
    cookieHandler: <Function>,
    expirationTime: <Number> (in seconds),
    position: <String> ("left_bottom", "left_top", "right_bottom", "right_top"),
    privacyUrl: <String>,
    requestDataTypes: <Array>[application|usage|statistics|advertising],
    targetUrl: <String>,
    termsUrl: <String>,
    testMode: <Boolean>,
    textMessage: <String>, <Object>
  });

</script>
CSS Reference
<link rel="stylesheet" href="{URL}/scripts/kit/xcoobee-cookie-kit.min.css">All of the display elements can be overridden, however, we can not support non-standard CSS values.
Browser Support
Internet Explorer 11+, Google Chrome, Mozilla Firefox, Opera, Edge.
Support
Please use the Github issues page